How to join a Minecraft server on PS5, Xbox and Switch
You've got a server, your friend has a PlayStation, and then it turns out: Minecraft on the console has no button to enter a server address. Only Microsoft's "Featured Servers", Realms and friends' worlds. That is a limitation of the console version itself, not of the server. Fortunately there are two ways around it, both free, and both without "cracking" anything on the console. This article explains them for Xbox, PlayStation 4/5 and Nintendo Switch, and is honest about the downsides.
First: which servers can a console join?
Consoles run Minecraft Bedrock Edition. So they can join any Bedrock server (port 19132, UDP) and any Java server running Geyser and Floodgate, which translate the Bedrock protocol to Java. Which of the two to choose is covered in Java and Bedrock together on one server. For joining from the console it makes no difference: both methods below work for either.
Method 1: BedrockConnect via a DNS setting
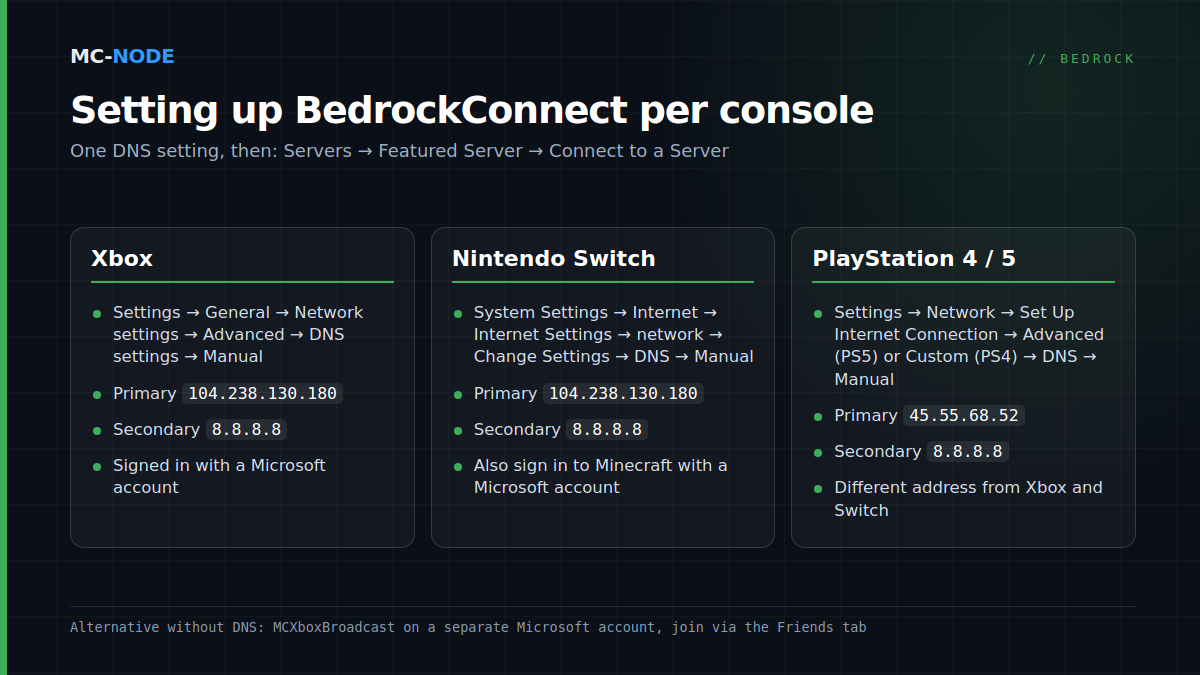
BedrockConnect is an open-source project that has been around since 2019. The idea is clever: you tell your console to use a different DNS server. That DNS server redirects the addresses of the Featured Servers to BedrockConnect. When you then click one of those Featured Servers in Minecraft, instead of that server you get a menu where you enter an address and port yourself, plus a server list you can save. Nothing is downloaded or modified on the console; the setting simply lives in your network settings and can always be set back to automatic.
Xbox One and Series
- Settings → General → Network settings → Advanced settings → DNS settings → Manual.
- Primary DNS
104.238.130.180, secondary DNS8.8.8.8. Save. - Start Minecraft, open the Servers tab and pick a Featured Server (for example Mineville, Lifeboat, The Hive, Galaxite or Enchanted).
- The BedrockConnect menu opens. Choose Connect to a Server and enter your server's address and port.
Nintendo Switch
- System Settings → Internet → Internet Settings → your network → Change Settings → DNS Settings → Manual.
- Primary DNS
104.238.130.180, secondary DNS8.8.8.8. Save and reconnect. - From there it's exactly the same as on the Xbox: Servers → a Featured Server → Connect to a Server.
PlayStation 4 and 5
- PS5: Settings → Network → Settings → Set Up Internet Connection → your network → Advanced Settings → DNS Settings → Manual. PS4: Settings → Network → Set Up Internet Connection → Custom → DNS Settings → Manual.
- For PlayStation you use a different address: primary DNS
45.55.68.52, secondary DNS8.8.8.8. - Then here too: Servers → a Featured Server → Connect to a Server.
If it doesn't work, check three things: whether you are signed in to Minecraft with a Microsoft account on every console (on PlayStation and Switch too), whether the DNS setting was really saved (some consoles reset it after switching networks), and whether you're using the right port number; on a rented server that is often not 19132 but the port from your panel.
The downsides of the DNS method
The public BedrockConnect DNS is a free community service, run by volunteers. It has worked for years, but nobody promises you uptime. As long as the DNS setting is in place, all of the console's other name lookups go through that server too; that isn't a problem for playing, but it is something to be aware of. If you want to be independent, you can run BedrockConnect yourself: it's a small Java program plus a DNS server, which fits comfortably on a VPS at €2.00 per month. For a group of friends that's overkill; for a community with a hundred console players it's worth it.
Method 2: via the friends list with MCXboxBroadcast
The second route asks nothing of the player. MCXboxBroadcast is a program you run on or next to your server, signed in to a separate Microsoft account. It announces your server to Xbox Live as a "joinable world" of that account. Anyone who has that account as a friend then simply sees your server in Minecraft's Friends tab and joins with one click, with no DNS fiddling. It exists as an extension for Geyser (a file in the extensions folder) and as a standalone version for Bedrock servers.
Two honest caveats. The developers strongly recommend a separate account, because the program behaves like a game client and Microsoft could in theory block that account; so never use your own. And it is officially aimed at Xbox; in practice, PlayStation and Switch players signed in with their Microsoft account also see the session in their friends list, but don't count on it blindly. For a server with lots of young console players it is nevertheless the friendliest method: "add this account and click Friends" is something you can explain to anyone.
Which method for whom?
| Situation | Advice |
|---|---|
| A few friends, set up once | BedrockConnect via DNS |
| Community with lots of (young) console players | MCXboxBroadcast on a separate account, DNS as a fallback |
| Java server with Geyser | Both work; MCXboxBroadcast as a Geyser extension is the most convenient |
| You don't want to set anything up | Realms, with the limitations of Realms (no plugins, ten players) |
What to sort out on the server itself
For console players, little extra is needed on the server side. On a Bedrock server: make sure online-mode=true is set (Microsoft account required, which prevents cheating with fake accounts) and enable a whitelist if it's a private server. On a Java server: install Geyser and Floodgate, so console players can log in without a Java account. Our Bedrock packages start at €2.50 per month and a Java server at €0.50, both with DDoS protection and cancellable monthly. The difference between the two editions is in the knowledge base: Java or Bedrock?.